Traverse Global v11.2
User Defaults - Admin
The User Defaults - Admin maintenance screen allows you to set defaults for Users, SD Service Zones, SD Order Categories, Workstation, IN Location, Label Types, and AppCentral Integrations.
User defaults
You can assign default batch codes, location ID, order category, and service zone to a selected user.
For WMS, besides setting a default adjustment batch code, location ID, and default transfer batch code, you can set default receiving, packing, and working bins, as well as a default inventory location and a default printer. See the Bin maintenance function topic for more details.
- Select 'User' in the Type drop-down list.
- Select a User ID for which you want to set defaults.
- You have the option to copy defaults from another user via the Copy From drop-down list.
- Select an application in the left-hand panel.
- In the right-hand panel, enter or select, as appropriate, default values for the option(s) listed.
- Save your settings.
SD Service Zone defaults
You can assign default COGS and Sales override accounts for Labor, Parts, and Travel to a selected service zone. These selections override the standard GL accounts at the time the transaction is entered. You can change these accounts if necessary at the time you enter the transaction.
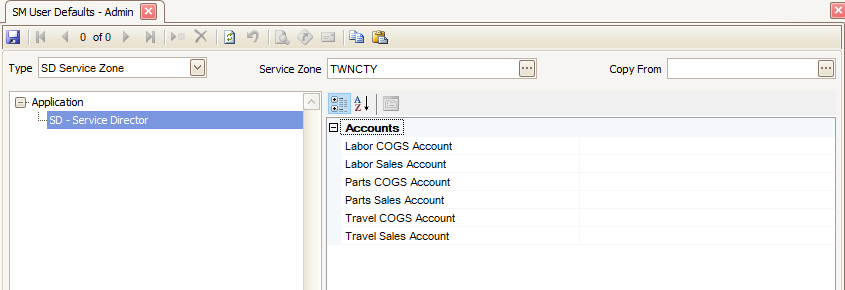
- Select 'SD Service Zone' in the Type drop-down list.
- Select a Service Zone for which you want to set defaults.
- You have the option to copy defaults from another zone via the Copy From drop-down list.
- Select default account numbers for the listed accounts. You can also use question marks (?) as wild cards when entering account numbers by substituting a question mark for each digit for which you want to consider all values. For example, if you want to specify any account that begins with 02-200, you would substitute a question mark for each of the digits in the last segment of the number: 02-200-????
- Save your settings.
SD Order Category defaults
You can assign default COGS and Sales accounts for Labor, Parts, and Travel to a selected order category. These selections override the standard GL accounts at the time the transaction is entered. You can change these accounts if necessary at the time you enter the transaction.

- Select 'SD Order Category' in the Type drop-down list.
- Select an Order Category for which you want to set defaults.
- You have the option to copy defaults from another category via the Copy From drop-down list.
- Select default account numbers for the listed accounts. You can also use question marks (?) as wild cards when entering account numbers by substituting a question mark for each digit for which you want to consider all values. For example, if you want to specify any account that begins with 02-200, you would substitute a question mark for each of the digits in the last segment of the number: 02-200-????
- Save your settings.
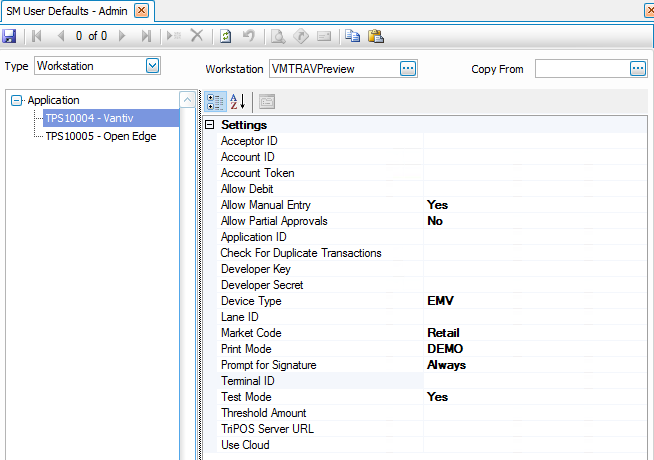
Workstation Defaults
If you have workstations that use settings that are different than those you entered in the Payment Service Integration screens, you can set up Workstation defaults. Use this option to configure a workstation to use a credit card reader, show a print preview (for testing purposes) rather than printing a receipt, or set a workstation up for a different method of utilizing the payment service, such as retail workstations rather than MOTO (mail order/telephone order). You can configure certain workstations to use a Retail account by entering the applicable settings in the workstation defaults screen.
The options that can be set per workstation may differ depending on the payment service you are using. Options may include allowing manual entry, device type, print mode, prompting for signature, terminal ID, and lane ID, among others.
To set up workstation defaults, open the User Defaults – Admin function from the SM Company Setup menu.
- Select ‘Workstation’ as the Type of default from the drop-down list.
- In the Workstation field, if you are entering a new workstation, enter the workstation name into the field. If you are editing the workstation, select it from the drop-down list.
- If you are entering a new workstation, you have the option to copy defaults from another workstation by selecting an existing workstation in the Copy From drop-down list.
- The settings for the selected payment service are also available on the Payment Service Integration configuration screen for the payment service. Settings you select in the User Defaults – Admin function will override the global settings on the Payment Service Integration screen.
The settings outlined in blue are only found on the User Defaults – Admin screen. The settings outlined in red appear in both screens.
Vantiv/Worldpay
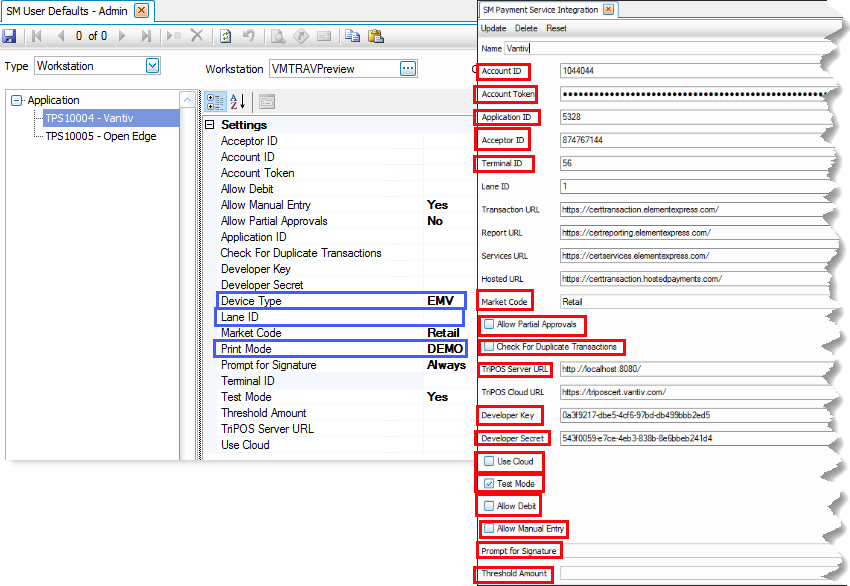
OpenEdge
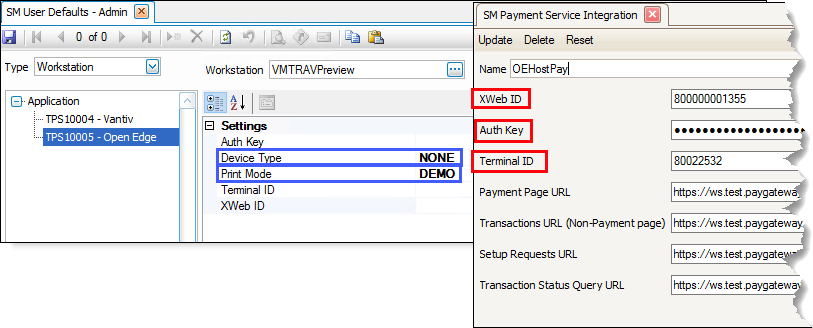
- If you want the workstation to use a credit card reader, such as in a retail situation, set the DeviceType value to ‘EMV’. If you set the DeviceType value to 'NONE', the user must enter credit card information manually.
- For Vantiv/Worldpay, if you set the DeviceType to ‘EMV’, and the device has been paired to a port using the Lane Manager function, enter the Lane ID for the device.
- By default, the workstation will print the receipt right after the card is processed. A PrintMode value of ‘PRINT’ or blank will perform the default action (print a receipt after the card is processed). If you want the workstation to display a print preview of the receipt, such as during testing, set the PrintMode value to 'DEMO'
NOTE: The print preview of the receipt will not allow you to save or print the receipt. If you have archiving turned on in the SM business rules, a PDF of the receipt is saved as an archived document, which will allow you to retrieve the receipt if needed.
- If the workstation utilizes the payment service differently than others, such as a retail workstation rather than MOTO (mail order/telephone order), you can configure the workstation to use a Retail account by entering the applicable settings.
- When you are finished editing settings, click the Save button on the toolbar.
NOTE: To view the saved workstation defaults, you must close the User Defaults – Admin screen, then reopen it.
IN Location defaults
You can assign default bins (default, packing, receiving) to each inventory location. These selections override the default bins set up in the IN Location maintenance function. You can change these defaults if necessary at the time you enter the transaction. You can also select a default printer for the inventory location.
- Select 'IN Location' in the Type drop-down list.
- Select a Location ID for which you want to set defaults.
- You have the option to copy defaults from another location via the Copy From drop-down list.
- Select an application for which you want to set defaults:
- Pick Overage Percent - Enter 0 to prevent picking more than the required quantity. Enter a percent (integer) greater than 0 that a user is allowed to over-pick an item. For instance, if you enter a pick overage percent of 5, and the quantity required is 100, the user is allowed to pick up to 105. (Qty Required * 1 + (Pick Overage Percent/100)) Leave blank for no quantity restrictions.
- Receive Overage Percent - Enter 0 to prevent receiving more than the required quantity. Enter a percent (integer) greater than 0 that a user is allowed to over-receive an item. For instance, if you enter a receive overage percent of 5, and the total quantity to be received is 100, the user is allowed to receive up to 105. (Qty Required * 1 + (Receive Overage Percent/100)) Leave blank for no quantity restrictions.
- Receive Overage Percent - Enter 0 to prevent receiving more than the required quantity. Enter a percent (integer) greater than 0 that a user is allowed to over-receive an item. For instance, if you enter a receive overage percent of 5, and the total quantity to be received is 100, the user is allowed to receive up to 105. (Qty Required * 1 + (Receive Overage Percent/100)) Leave blank for no quantity restrictions.
- Pick Overage Percent - Enter 0 to prevent picking more than the required quantity. Enter a percent (integer) greater than 0 that a user is allowed to over-pick an item. For instance, if you enter a pick overage percent of 5, and the quantity required is 100, the user is allowed to pick up to 105. (Qty Required * 1 + (Pick Overage Percent/100)) Leave blank for no quantity restrictions.
- Select default bin IDs for the listed bins.
- Select a default label printer for the location, as applicable, for the Default Printer.
- Save your settings.
MP - MFG Production
PO - Purchase Order
SO - Sales Order
WM - Warehouse Management
WM User defaults
You can assign a default inventory location, printer, batch codes, and default bins (working, packing, receiving) to each user. You can change these defaults if necessary at the time you enter the transaction.
- Select 'User' in the Type drop-down list.
- Select a User ID for which you want to set defaults.
- You have the option to copy defaults from another user via the Copy From drop-down list.
- Select default batch codes, label printer, inventory location, and bins for the user.
- Save your settings.
WM Label Types
You can assign default label styles for bin, container, item, and receiving labels.

- Select 'Label Types' in the Type drop-down list.
- Select a Label for which you want to set the style.
- You have the option to copy the style from another user via the Copy From drop-down list.
- Select a default Label Style Name for the label.
- Save your settings.
AppCentral Integrations
This section enables you to define default settings for integrations managed through AppCentral, including batch codes for Accounts Payable (AP) and Purchase Order (PO) transactions created from AP Invoice Automation (APIA), as well as retention settings for Aptean CRM. These options help ensure consistent processing and prevent transactions from being posted into unintended batches.
Default Batch Code for AP Transactions
You can specify a default AP Transaction Batch Code for AP transactions created from APIA. When a default value is set, all new AP transactions use this batch code automatically. If no value is defined, the system uses the standard “Default” batch code.
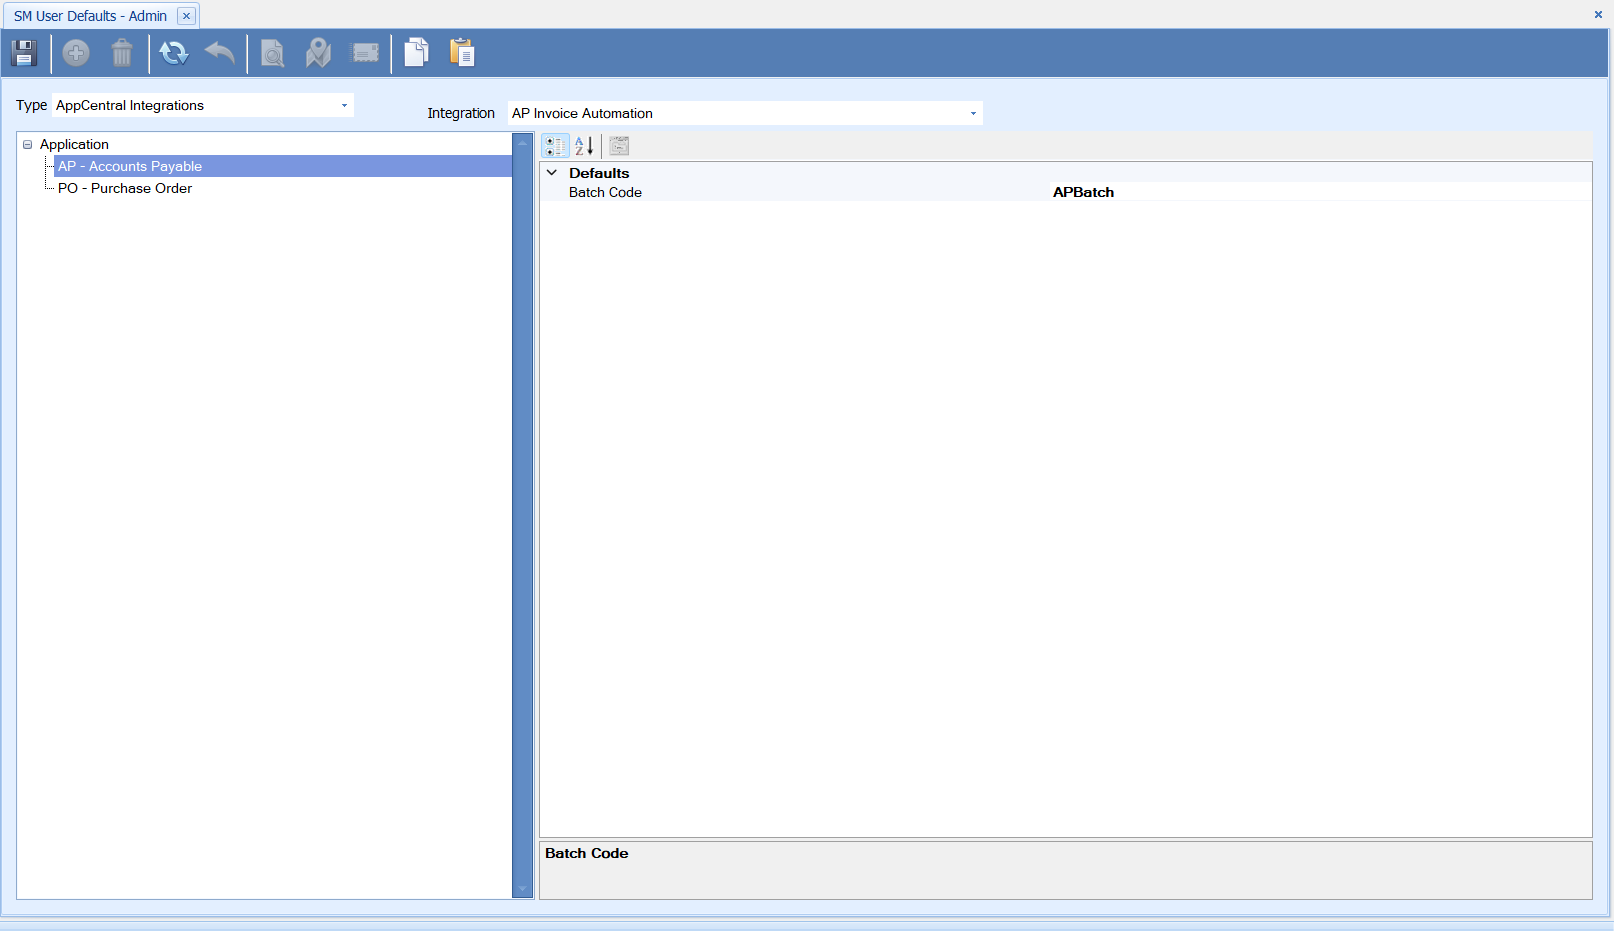
Default Batch Code for PO Transactions
You can also define a default batch code for PO invoices created in APIA. When the PO invoice is transferred to Traverse, the system applies this default value to prevent the invoice from posting in receiving batches. If a user-defined default is present, it overrides any batch code already assigned to the incoming PO transaction. If no default is defined, the original batch code remains unchanged.

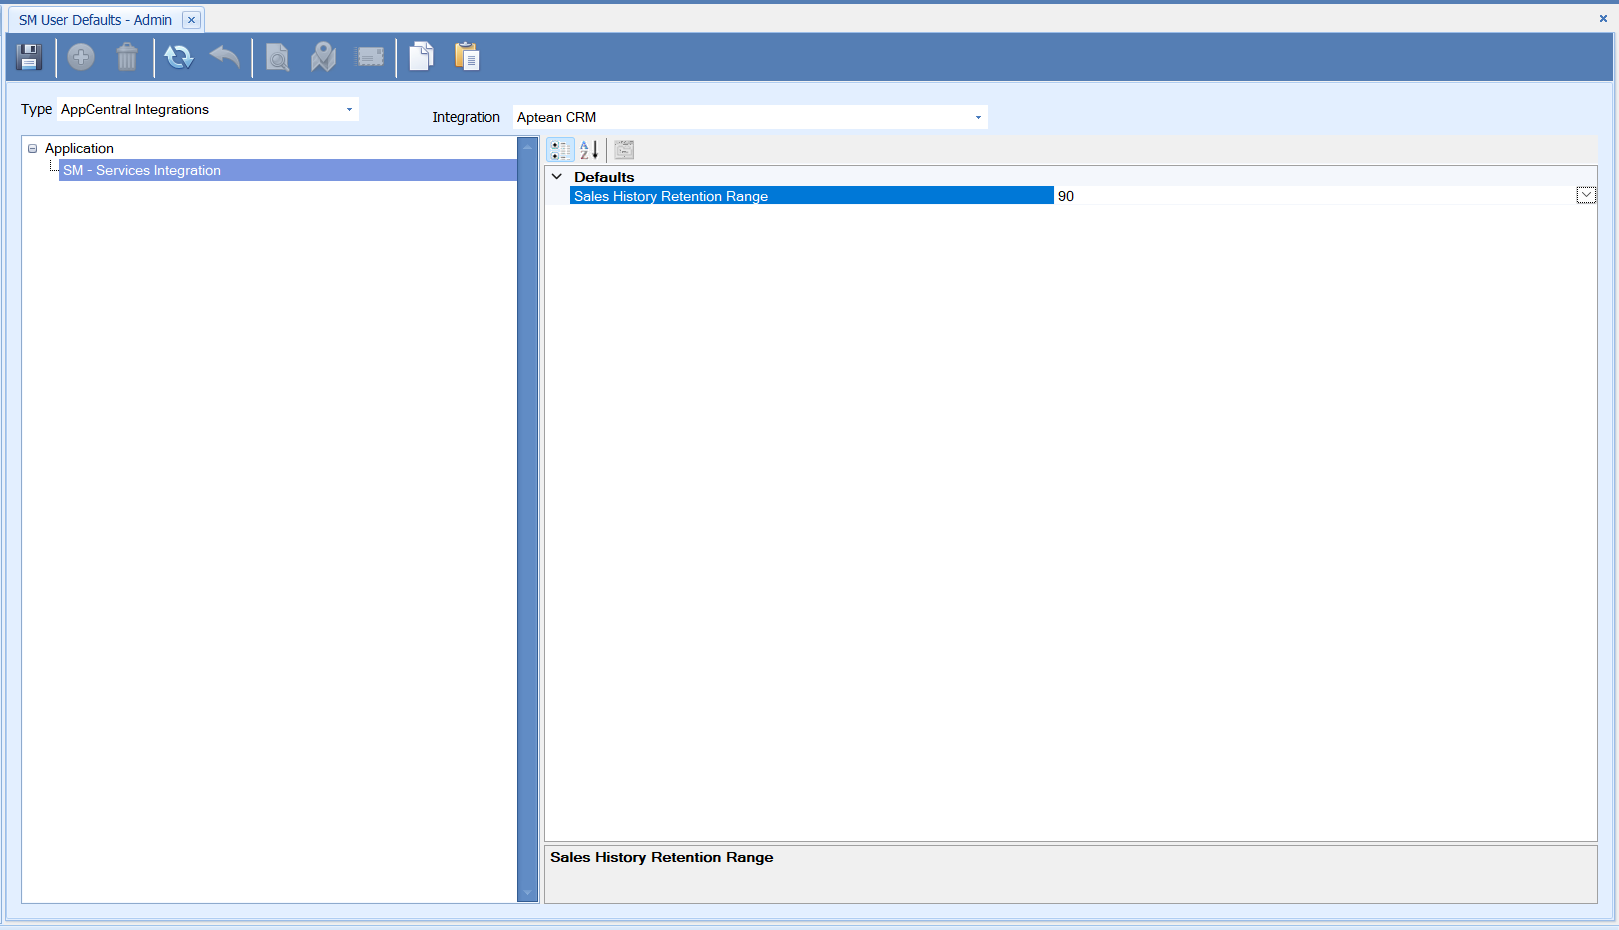
Sales History Retention for Aptean CRM
You can configure the Sales History retention range for Aptean CRM. A drop-down list allows you to choose 90, 180, or 360 days. The system uses this value during Bulk Sync operations to determine how much sales history is included when synchronizing data with CRM.
Assigning Default Batch Code / Sales History Retention
Use this procedure to assign a default batch code for AP or PO transactions created through AP Invoice Automation.
-
Click the Type drop-down list and select AppCentral Integrations.
-
Click the Integration drop-down list and choose the required integration, such as AP Invoice Automation or Aptean CRM.
-
Click an application or option in the left panel.
-
In the right panel, enter or select the default value you want to assign (such as Batch Code or Sales History Retention).
-
Click Save to apply your changes.